Buyer’s Home Inspection
With Buyer’s Home Inspections from Frontline Home Inspections LLC in the East Tennessee area, you can move in with peace of mind that your home is ready for your family. Contact me and allow me to defend your frontline with a detailed home inspections before you buy, and I will provide you with the understanding you need to help you make informed decisions about your next home!


Find Your Dream Home
When you have found your next potential home, a professional inspection can help you decide if it is the right dream home for your needs. If it checks all the boxes of your wants and needs in a home, it can be easy to get excited and want to buy quickly. At Frontline Home Inspections, we want to celebrate the good find with you but not until we have thoroughly inspected the home. I will help you identify any current problems in the home, such as faulty wiring or poor plumbing, so you can decide if it truly is your next dream home.
Experienced Professionals You Can Trust
Choosing the right home inspector is as important as choosing the right house. The wrong inspection service could lead you to buy a house full of issues for you to handle. As licensed home inspection professional, Frontline Home Inspections follows the professional guidelines set forth by the State of Tennessee’s Standards of Practice. In addition, we have adopted InterNACHI’s Standards of Practice, so you can rest assured knowing that your inspection will be done to the highest standards in the industry. When you hire Frontline Home Inspections to do your buyer’s home inspection, you are getting experienced, trained, and honest professional, that will help you make the best decision about your new home purchase. You can trust Frontline Home Inspections to defend your frontline and protect your number one investment, I will treat your home as if it were my own. After all, you not only want it to feel right when you walk in the door, you want it to be right for years to come.
PRE-LISTING INSPECTION
Are you preparing to sell your home? Consider having me perform a pre-listing home inspection before you put it on the market.
Here’s Why…
Pre-Listing Inspections Save $$$
When you are selling your home in the East Tennessee area, a pre-listing inspection can prevent the stress of having to make repairs quickly.
Traditionally, after a seller receives an offer on their home from a buyer, the potential purchaser will order and pay for a home inspection.
The inspector, representing the buyer, will report to them the major issues they find with your home, giving them an advantage in the negotiations.
When you order a seller’s pre-listing home inspection, you know going in what the issues are and can take care of them ahead of time.
You can also provide copies of the inspection report to REALTORS® and potential buyers, giving them confidence that the home has already been checked out before they tour it.
Advantages for the Seller
Pre-listing inspections offer a number of advantages to the homeowner.
Hiring Your Own Inspector
- The seller’s home inspection is completed on your time schedule.
- If your home has a problem that needs immediate attention, such as water in a crawlspace, damaged windows, or leaking pipes, you have time to make repairs.
- When the buyer hires an inspector, normally the seller is not around during the inspection. When the seller hires an inspector for a pre-listing home inspection, he/she can assist the home inspector.
- The seller has time to go over the details with the inspector. This provides an opportunity to give additional input to the inspector before the report is generated.
- A seller’s home inspection can assist you in pricing the home if there are problems.
- The seller can possibly ask a higher price if he/she can show that there are no problems or the problems have been corrected.
Know What You’re Dealing With.
- A seller’s home inspection reveals problems ahead of time, which:
- Will allow the home show better.
- Gives the seller time to make repairs and shop for competitive contractors.
- Permits the seller to attach repair estimates or paid invoices to the inspection report.
- Removes over-inflated buyer-procured estimates from the negotiation table.
- A pre-listing inspection can alert the homeowner to potential safety issues that may exist before allowing possible buyers onto the property.
Provides Good Marketing & Good Will
- The report provides a third-party, unbiased opinion to offer to potential buyers.
- A seller’s inspection (pre-listing inspection) permits a clean home inspection report to be used as a marketing tool.
- A seller’s inspection (pre-listing inspection) is the ultimate gesture in forthrightness on the part of the seller.
- The report might relieve a prospective buyer’s unfounded suspicions before they walk away.
- The report might encourage the buyer to waive the inspection contingency.
- The deal is less likely to fall apart when a buyer’s inspection unexpectedly reveals a last-minute problem.
- The report provides full-disclosure protection from future legal claims.
Advantages for the Buyer
Pre-listing inspections offer a number of advantages to the buyer.
- There is no need for the buyer to order a home inspection.
- The seller paid for the inspection and there is no need to pay for another one unless the buyer wants it.
- You have a third party report telling you the condition of the property before you make an offer, reducing the back and forth negotiations.
- No surprises to deal with after you are emotionally and financially committed.
- Any issues with the home are acknowledged or either eliminated before the buyer makes an offer.
- Financial institutions may consider the report favorably when considering mortgage arrangements.
- A seller’s home inspection allows the buyer to sweeten the offer without increasing the offering price by waiving inspections.
Common Myths
Don’t believe the common myths about pre-listing inspections.
Q. Seller’s home inspections kill deals by forcing sellers to disclose defects they otherwise wouldn’t have known about.
A. A defect material enough to kill a real estate transaction is likely going to be uncovered by the buyer’s home inspection. It is best to discover the problem ahead of time and deal with it before it can kill the deal.
Q. A newer home in good condition doesn’t need an inspection anyway. Why should the seller have one done? There are two answers to this question.
A.Buyer’s almost always order a home inspection, and increasingly on brand new construction, so the property is going to be inspected. Take advantage of the opportunity to inspect it on your timetable.
A. A home inspector’s job is to produce an objective report about the property you want to sell. If the property is truly in great shape, the inspection report becomes a useful marketing piece for your real estate professional. An added benefit is that the report was generated by an impartial party.
Radon Gas Testing
What is Radon gas? It is a deadly, naturally occurring gas, found throughout Tennessee. Long-term exposure can cause lung cancer. Learn more…

Why Is Radon a Problem?
In 1900, radon became the fifth radioactive element discovered. Radon is a naturally occurring element that is produced by the radioactive decay of radium 226, which can be found in many types of ores, stones, and rocks, all common to the terrain of Tennessee.
Radon gas is dangerous and can be life-threatening. Long-term exposure to radon gas is estimated to kill 20,000 or more people per year.
Contributing factors to its deadly nature include: it is odorless, tasteless, and invisible. Testing is the only way to know if it is present.
In 2005, the U.S. Surgeon General stated, “Indoor radon gas is the leading cause of lung cancer among non-smokers in the United States. Breathing radon gas over prolonged periods can present a significant health risk to families all over the country. It’s important to know that this threat is completely preventable. Radon can be detected with a simple radon test and fixed through well-established venting techniques.”
The U.S. Surgeon General, Environmental Protection Agency, and the American Cancer Society all recommend that every home be tested for radon. Our advice: call us for radon testing in your home!
Is Radon Gas Present in Tennessee?
Yes. Most home buyers are still unaware of the dangers of radon gas even though it is known to be present in every county in Tennessee. Eastern and Middle Tennessee are the two regions the EPA considers radon to be the highest threat to homeowners. According to the EPA, the counties where we live, Davidson, Wilson, Rutherford, Knox, Loudon, Anderson, Blount, Roane, Union, Grainger, Jefferson, and others, are the most likely to have radon gas exposure above 4 pCi/L, which can be deadly.
Roughly 30% of the homes we test contain dangerous levels of radon gas of 4 pCi/L or more!

ZONE 1 (RED)
HIGH PROBABILITY
Homes have an indoor average radon gas greater than 4 pCi/L!
ZONE 2 (ORANGE)
MODERATE PROBABILITY
Homes are likely to have average radon gas levels between 2 and 4 pCi/L!
ZONE 3 (YELLOW)
LOW PROBABILITY
Homes are likely to have average radon gas levels less than 2 pCi/L!
Do I Need a Radon Test?
Most likely, the answer is, “Yes!” The EPA states that 1 out of every 15 homes in America has a radon problem. In some Tennessee counties that number is as high as 7 out of 10. The EPA recommends EVERY home in America be tested for radon..
“All homes should test for radon, regardless of their geographic location or zone designation.” – Environmental Protection Agency
“My home is on a slab, I don’t need a radon test do I?”
Yes! A very high percentage of the tests that come back with elevated levels of radon gas are in homes with slabs. This includes homes with basements. Radon gas rises through the small pores in the concrete slab, the space around plumbing, and infiltrates the home.
“My home has a vented crawlspace, do I need a radon test?”
Homes with vented crawlspaces are less likely to have high levels of radon gas inside the home than a home on a slab. However, it is not impossible for a home with a crawlspace to have high level of radon gas inside the home. Over the years, we have seen a number of homes with a vented crawlspace have high radon gas levels.
Should you do it? This is a personal decision. If you are comfortable living in the home without testing, don’t order a radon test. If you are unsure and want to be sure, order the test.
What is Involved in a Radon Test?
“How long does it take to complete a radon test?”
Radon testing takes two to three days to complete. Industry standards dictate that the radon monitor must be left in place for a minimum of 48 hours to get an accurate reading. When we place a radon monitor on Thursday or Friday, typically, we deliver the results on Monday.
“Where do you place the radon monitor?”
We place the radon monitor in the lowest livable level inside the house. If your home has a basement, it is placed there. In homes without a basement, the radon monitor is placed in a room away from windows, doors, vents, and chimneys. Placing the radon monitor strategically away from vented areas provides a more accurate reading.
“I’m unsure of the radon gas levels in my home, now what?”
If you are a homeowner in Nashville or Knoxville Tennessee, and you don’t know the radon levels in your home, the obvious answer is that you need a radon test. Frontline Home Inspections is happy to perform a residential radon test for you. Our home inspectors use Radstar professional radon measurement equipment. After testing, your inspector provides a written report stating that radon levels are either below or above the recommended EPA action levels.
Your health and the health of your family are too important to take chances with anything other than a Certified Radon Report.
My House Tested High for Radon, Now What?
About 30% of the houses we test in East Tennessee have dangerous radon gas levels. So what can you do to correct this problem?
According to the EPA, radon mitigation is necessary when radon levels reach 4 pCi/L in your home. A number of companies in the Knoxville area perform radon mitigation. This usually involves drilling a hole in the slab and running a vent pipe through the ceiling and out the roof, or alternatively, through the side of the house. A small fan is often inserted to pull the radon through the pipe, bypassing the home’s intererior.
Does Frontline Home Inspections perform radon mitigation?
No, we do not do radon mitigation. Frontline Home Inspections only carries out the testing.
How Much Does a Radon Test Cost?
Depending on the location of the home and other factors, radon testing costs between $195-$250*.
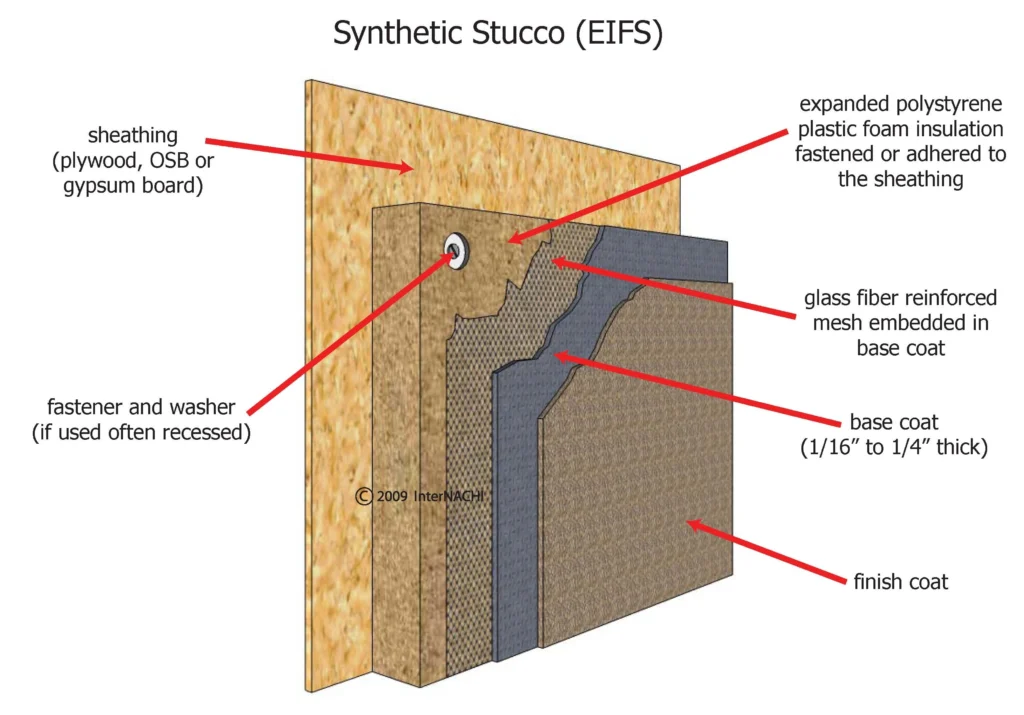
Synthetic Stucco (EIFS) Inspection
Synthetic Stucco, also known by its official name, External Insulation Finishing System (EIFS), can be aesthetically beautiful. It can also be a structural nightmare.

A Brief History of EIFS (Synthetic Stucco)
EIFS (Synthetic Stucco) was developed in Europe after World War II as an exterior insulation system. Primarily, contractors used it on homes with masonry walls due to the inherent difficulties associated with insulating them.
Masonry offers strength and durability to the structure, but it doesn’t provide space for insulation. Adding insulation to the inside of the house was not practical, so they needed a new product.
To help alleviate this problem, scientists created a process to add insulation to the outside of the house. EIFS (Synthetic Stucco) was born.
In 1969, building material suppliers introduced EIFS to American homeowners through a product named DRYVIT. It was an extremely water resistant material and resembled stucco. Before long, this product is being used in more than 30 states.
What are the Potential Problems of Synthetic Stucco?
In a relatively short period, several manufacturers began producing various versions of EIFS materials. Residential and commercial installations were common. Due to the high demand, sometimes inexperienced, or under-trained, installers made costly mistakes for the buildings’ owners.
Failures in some installations at roof rakes, chimneys, floor lines, around windows, doors, and protrusions caused problems.
Although the material itself is water resistant, sometimes moisture is able to get behind the siding and it cannot get out. This can lead to mold and wood rot between the exterior and interior walls. These conditions are also perfect for subterranean termites.
Any type of exterior siding is susceptible to moisture problems. However, because of the superior nature of EIFS’ water resistance, the problems are intensified. Once water gets in, it cannot get out. The only way to know if you have damage is to do a water analysis.
The problems with EIFS are widespread. One environmental inspection company inspected more than 100 homes over a ten-month period and all but a handful had damage to some degree.
Most, if the EIFS was installed properly, could be corrected with minor repairs. However, some of the homes needed repairs costing as much as $60,000 on a $500,000 home.
How Much Does a Synthetic Stucco (EIFS) Inspection Cost?
Due to the many variables involved in an EIFS inspection, we can only quote a price after gathering some information from you. We need to know the total square footage of the house, how many stories, how much of the exterior is covered in EIFS, and the location of the house.
Call us and we will be happy to tell you what the inspection will cost.
How Do I Order a Synthetic Stucco (EIFS) Inspection?
Frontline Home Inspections can help you protect the investment in your home by identifying current or potential problems. We have the training, experience, and equipment to inspect your home for the type of damage EIFS may cause. If you have Synthetic Stucco (EIFS) on your home, please give us a call and schedule an inspection. Peace of mind costs so little compared to what the repairs may cost if you let damage go undetected.
For more information about EIFS, please visit EIMA.
Pool & Spa Inspections
A swimming pool is not only a great investment for your home, but a wonderful way for your family to spend time together. There is a sense of security in knowing the quality of your swimming pool if you hired the contractor, selected the materials and design, and had your own pool built or installed. But, what if you are purchasing a home with an existing pool? How would you know if the pool is working as it should? Are there any repairs needed? Safety? Frontline Home Inspection has the experience needed to perform your residential pool inspection to put your mind at ease.

The inspection I conducted is a visual and operational inspection of the pool and equipment. After my inspection is completed, I will provide a report with repair recommendations, recommendations to improve Safety and a cost estimate for those repairs / changes.
An average inspection takes about an hour and the written report can be added to your overall home inspection report or delivered as an independent report. We do not make any repairs during an inspection, nor do we perform any pressure testing of plumbing lines as part of an inspection. If there is reason to suspect underground lines are leaking, we would make the recommendation to perform pressure testing.
In addition to our pool inspection services, I also offer spa inspection services to ensure your spa is safe and in optimal condition. Whether you’ve installed a spa yourself or are purchasing a home with an existing spa, it’s essential to know the condition of the equipment and whether any repairs are necessary.
My inspection covers water quality, filtration systems, electrical elements, and overall structural integrity, providing you with a detailed report that includes any repair recommendations and estimated costs.
Like my pool inspections, our spa inspections take about an hour and the written report can be added to your overall home inspection report or delivered as an independent report.. While we do not perform repairs or pressure tests during the inspection, we will recommend further testing if we suspect plumbing or underground leaks.
For more information or to schedule your pool or spa inspection, contact me today!
Home Maintenance Inspection

It is recommended to have a home inspected annually or semiannually to see if all systems and components are in good condition and functioning properly. This takes a close look at the critical aspects of your home like the electrical, plumbing, and HVAC systems and looks for any structural issues or property damage.
Home Energy Audit
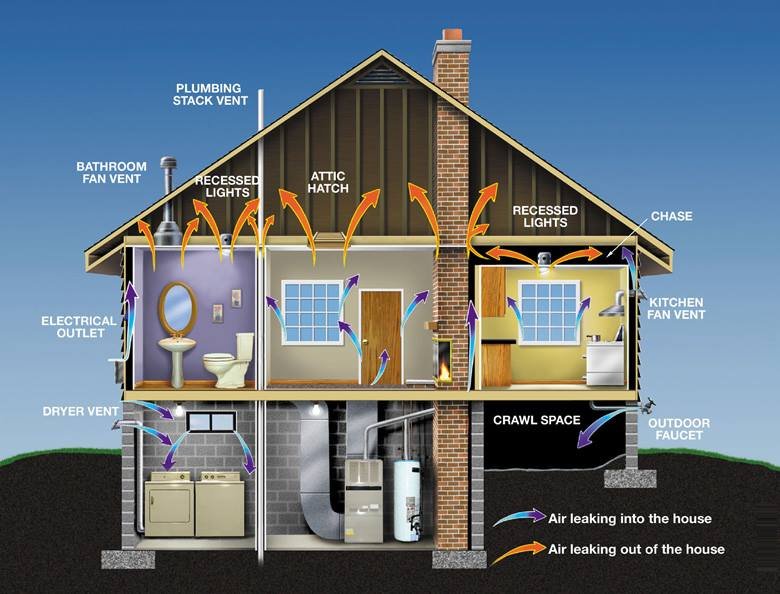
You’ve probably noticed your energy bills creeping higher, but you’re not sure exactly where your home is wasting the most energy. That’s where a home energy audit comes in – it’s your roadmap to understanding how your house uses (and loses) energy. While you might think your drafty windows are the main culprit, professional auditors often uncover surprising energy thieves hiding in plain sight.
The detailed evaluation can reveal costly inefficiencies you’d never suspect, from inadequate insulation to outdated HVAC systems. Let’s explore how this systematic assessment can help you transform your home into an energy-efficient fortress.
What Is a Home Energy Audit?
When you’re looking to cut energy costs and improve your home’s efficiency, a home energy audit serves as your detailed roadmap to success. This extensive assessment examines your home’s energy usage patterns and identifies areas where you’re losing energy and money.
During the evaluation, certified professionals will conduct detailed inspections of your property, focusing on critical elements that affect energy efficiency. Your audit will include specialized tests, such as blower door assessments that measure air leakage throughout your home. These tests reveal hidden gaps and cracks that could be driving up your utility bills.
You’ll receive a detailed report outlining specific areas of energy loss and recommendations for improvements.
Benefits of a Home Energy Audit
The investment in a home energy audit delivers multiple rewards that extend far beyond the initial assessment. When you schedule a home energy audit, you’ll gain detailed insights into your home’s energy performance and discover specific ways to reduce your energy consumption.
The evaluation can lead to impressive savings, with many homeowners seeing their energy bills drop by 25% or more.
The audit report provides you with a prioritized list of improvements, helping you make strategic decisions about heating and cooling upgrades, insulation enhancements, and air sealing measures.
You’ll also learn about available rebates and incentives from local utility companies, which can help offset the cost of recommended improvements.
Home Energy Audit Inspections
Home Energy inspections typically last between two to three hours, diving deep into your home’s energy performance.
During these extensive energy audits, certified inspectors use specialized tools and software to examine every aspect of your home’s energy usage. They’ll conduct essential safety tests on your fossil fuel appliances and perform a blower door test to measure air leakage throughout your living spaces.
Your home inspection will reveal common issues that could be driving up your energy costs, such as insufficient insulation, leaky windows and doors, and inefficient heating and cooling systems.
After collecting and analyzing the data, you’ll receive a detailed Home Energy Audit Report with specific recommendations for improvements.
- You’ll discover hidden air leaks that are literally letting your money escape through the walls.
- You’ll learn if your heating system is silently wasting up to half of your energy dollars.
- You’ll understand exactly which improvements will give you the biggest bang for your buck.
Following your audit, you’ll get a prioritized action plan and provide you with recommendations of the items that are most critical and have the biggest impact on your energy-saving upgrades.
Potential Costs & Savings
Understanding the financial implications of a home energy audit helps you make an informed decision about this valuable investment. The initial costs range from free to $900, depending on your home’s size and the assessment’s depth.
When you consider that energy bills can drop by 5-30% after implementing audit recommendations, you’re looking at significant long-term savings. Your average annual savings could reach $660, making the initial investment worthwhile. You’ll also discover opportunities for additional savings through rebates and incentives for energy-efficient upgrades.
The audit’s benefits extend beyond reduced energy use – you’ll likely see an increase in your property value after making the recommended improvements. Contact Frontline Home Inspections for All Your Home Energy Audit Needs – Call today!
Home energy audits reveal hidden energy drains impacting your utility costs. I am a certified inspector and provide thorough, unbiased assessments of your home’s energy efficiency. With same-day reporting, potential energy savings of 5-30%, I identify specific improvements to reduce energy consumption.
Thermal Leak Scan
If you’re concerned about your home’s energy efficiency, you’ll want to contemplate a thermal leak scan as your next diagnostic step. This advanced imaging technology reveals what your eyes can’t see: the hidden pathways where your heated or cooled air silently escape, costing you money with every passing day.
While basic home maintenance might catch obvious issues, a thermal scan exposes the subtle temperature variations that indicate insulation gaps, moisture problems, and air leaks throughout your property. As utility costs continue to rise, understanding these invisible vulnerabilities becomes increasingly essential for both your comfort and your wallet.
What is a Thermal Leak Scan?
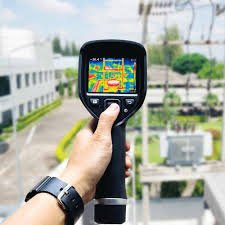
A thermal leak scan serves as your building’s diagnostic tool, using advanced thermal imaging technology to detect hidden problems that the naked eye can’t see. When you conduct a thermal leak scan, you’re fundamentally creating a heat map of your property that reveals temperature variations indicating potential issues with insulation, water intrusion, or air leaks.
Using a thermal imaging camera, you’ll capture thermal images that show different temperature patterns across surfaces. These patterns help you identify areas where heat is escaping or where moisture might be accumulating within walls, ceilings, or floors. The technology is particularly effective for leak detection because water-damaged areas typically appear as distinct temperature variations.
To confirm your findings, you can pair your thermal scan with a moisture meter, which provides precise measurements of moisture content in building materials. This combination gives you an all-encompassing understanding of your building’s condition without the need for destructive testing.
You’ll be able to detect moisture problems early, address insulation deficiencies, and maintain your building’s integrity before small issues become major concerns. Benefits For Home Energy Efficiency
Through the lens of home energy efficiency, thermal leak scans deliver substantial cost-saving benefits by pinpointing exactly where you’re losing heat and money. When you use a thermal camera to detect leaks, you’ll uncover hidden issues that could be costing you 10-30% more on your heating and cooling bills.
By conducting regular temperature measurement scans, you’re taking a proactive approach to maintaining your home’s energy efficiency. The visual data helps you make informed decisions about where to add insulation, seal gaps, or repair damaged areas. You’ll also be able to spot potential moisture problems before they become costly repairs, ensuring your home stays comfortable and efficient.
These scans aren’t just about immediate savings; they’re an investment in your property’s future value. When you address the issues revealed by thermal imaging, you’re improving your home’s energy efficiency rating, which can boost its market appeal. Plus, you’ll create a more comfortable living environment by eliminating drafts and maintaining consistent temperatures throughout your home. The targeted repairs you make based on thermal scan results will optimize your HVAC system’s performance and reduce unnecessary energy waste..
Professional Inspection Best Practices
Professional thermal leak scanning demands careful attention to key inspection protocols that guarantee accurate, reliable results. Before starting your building inspection, you’ll need to review historical data and identify potential moisture intrusion points to effectively plan your scan strategy.
When conducting the inspection, you should document everything using both standard digital photos and thermal imaging. Your thermal cameras must have appropriate sensitivity settings with a NETD of 30mK or better to detect subtle temperature variations accurately. You’ll want to pay close attention to environmental conditions, as factors like humidity and temperature differences can greatly impact your readings.
For investigating water leaks, implement a systematic testing approach. Start at the lowest point of the suspected area and work your way up, allowing 30-45 minutes per test section to guarantee thorough coverage. This methodical process helps you pinpoint exact locations of moisture issues and thermal anomalies.
Remember that successful thermal imaging requires more than just pointing and shooting – it’s about understanding building science, following established protocols, and maintaining consistent documentation throughout the inspection.
Contact Frontline Home Inspections Today!
A thermal leak scan from Frontline Home Inspections delivers critical insights into your home’s energy efficiency. Our certified inspectors utilize advanced thermal imaging technology to identify hidden air leaks, missing insulation, and potential moisture issues before they become costly problems.
Through our same-day reporting process, you’ll receive detailed documentation of our findings, helping increase your property’s value while creating a more energy-efficient living space.
Four Point Inspections
A “Four Point Inspection” focuses only on four main areas of interest in a home:
- HVAC (Heating, Ventilation, and Air Conditioning)
- Electrical wiring and panels
- Plumbing connections and fixtures
- Roof
The inspection and report describes the condition and age of these elements.
Why do I need a four point inspection?
Insurance companies have become increasingly reluctant to issue Homeowner Insurance Policies on older homes (usually 25 years old or more).
Their common concern is that there may be conditions in an older home that could become a liability to them. For instance, a home with a roof nearing the end of its reliable service life may fail while under the policy and the homeowner may seek reimbursement from their insurance company for damages to the home or its contents. Similar concerns extend to the condition of the HVAC, electrical and plumbing systems in an older home. If these elements are in poor condition, in need of being updated or replaced or were improperly installed, they may fail and cause fire or water damage to a home. Newer homes are assumed (by the insurance companies) to not have these problems as frequently as older homes.
Is there a standard form to fill out?
There is no industry wide standard form for a Four Point Inspection. Some insurance companies provide their own forms; however, most insurance companies will accept forms from companies that perform home inspections provided that they are filled out by qualified individuals.
Can I fill out the form myself?
Insurance companies want these forms filled out by certain qualified individuals such as a licensed Professional Inspector, Engineer, Electrician, General or Roofing Contractor.
I had a home inspection before I purchased the home.
Can I use my Home Inspection Report instead of getting a Four Point Inspection Report?
The insurance companies do not want large reports that contain other information. They want only specific information about the HVAC, plumbing, electrical system and roof in a short one or two page signed document. Before you pay for a home inspection you should research with your insurance company to see if they will require a Four Point Inspection Report. You can end up paying twice for much of the same service and information gathering.
New Construction Inspections
In most builders’ manuals, new, does not always translate to perfect construction. No matter how good your builder is, they are prone to making errors or overlooking certain building standards that you will later need to deal with as code violations. A properly licensed home inspector to conduct a thorough check as a final walkthrough with the builder to make sure that everything is in place for your new home to finally be handed over to you just the way you wanted it.
Pre-Warranty Expiration Inspections
Warranty inspections are performed during the 11th month of your 1-year Builder Warranty. The inspection will be performed to verify that proper building techniques were used and that the various components of the home were properly installed. You will be presented with a completed report at the end of the inspection along with digital photos taken as needed for inaccessible areas.
Why Get a Home Maintenance Inspection?
Identify Potential Problems: These inspections help uncover potential issues early, preventing costly repairs down the road.
Peace of Mind: Knowing the condition of your home can provide peace of mind.
Negotiation Tool: If problems are found, you can use the inspection report to negotiate repairs or credits with the seller.